
An intermediate Blues Guitar Solo requires that you have a grasp on many of guitar playing fundamentals. You should know the minor pentatonic scale, have a couple of memorized licks using that scale, and have the ability to use techniques such as slides, hammer pulls, bends, and hammer ons.
First, don’t ad lib but rather write your Blues Guitar Solo. Write ideas alternating between a scale idea, a lick idea using the notes of that scale, and then using a technique such as a bend or a slide. Practice and memorize until flawless. Then, ad lib using your written solo as a base of reference.
Know your solo so well that you can’t make a mistake. It’s at that point where you can really put your heart and soul into it.

Jim Sutton Institute of Guitar
Blues Lead Guitar Study 1
Blues guitar is a very free form of music. Almost any note can be worked into a blues phrase regardless of what key you are in.
A variety of scales can be used to create a particular sound and establish a home base to play around. The reason that we learn scales is so that we know where we are. knowing where we are in relationship to other tones rather than just playing a random selection of notes.
Each scale pattern is a blue print mapping out the notes which create a particular sound.
Through the Jim Sutton Institute of Guitar series of Blues Guitar Studies, several scale patterns are explored in depth. Phrases, riffs, arpeggios, and other techniques are applied to each interval of each scale pattern. These techniques, scales, and feel, are some of the elements which define style.
The focus of BLUES LEAD GUITAR STUDY #1 is on the minor pentatonic scale.
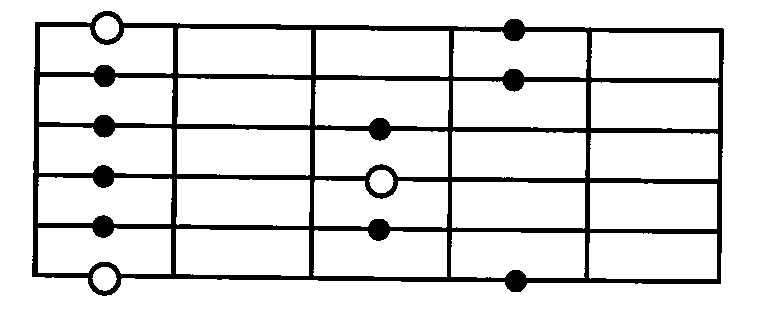
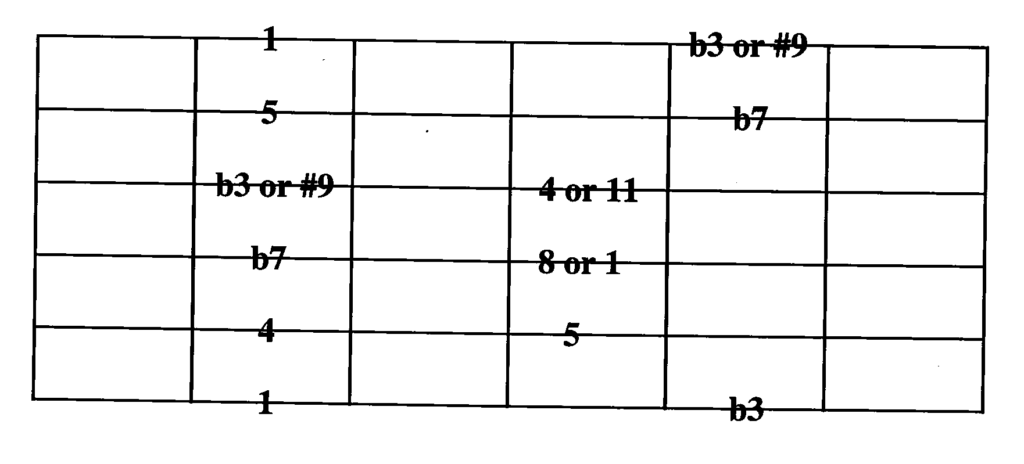
In the minor pentatonic scale pictured above, the open circle represents the root of that scale, and it is the tonal center of the scale, In other words, the note that phrases played within that scale want to resolve to.
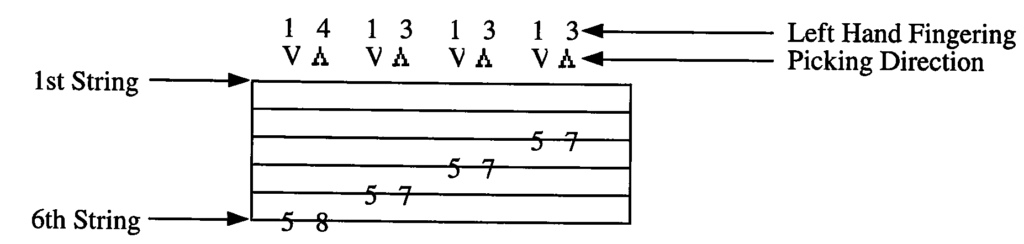
*TABLATURE. The numbers on the lined staff indicate the fret that your finger is on. The lines indicate the strings.
- Familiarize yourself with the A- Pentatonic Scale pattern. Play through the scale pattern 10 times ascending and descending.

2. Play through the scale adding one scale interval with each ascension…(up & back)
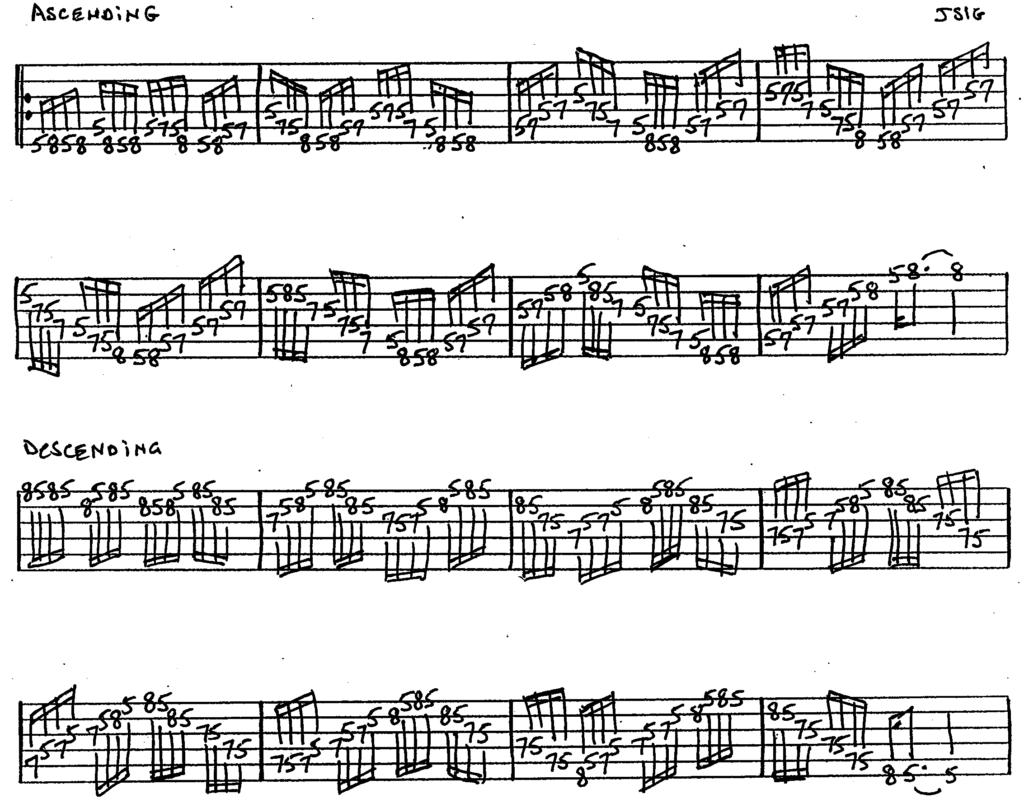
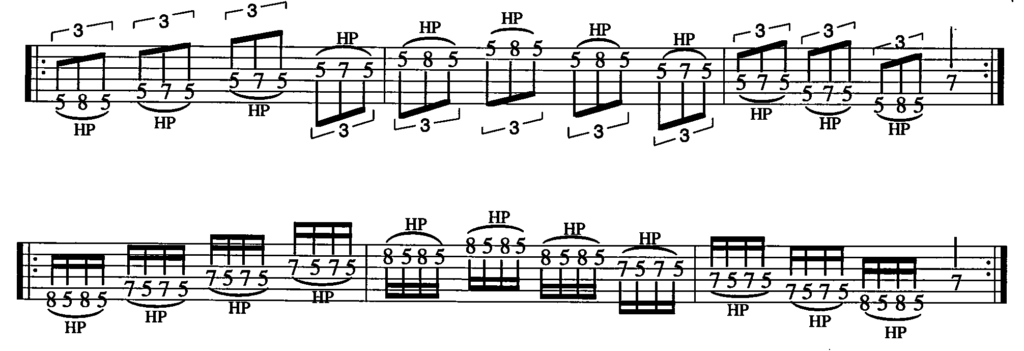
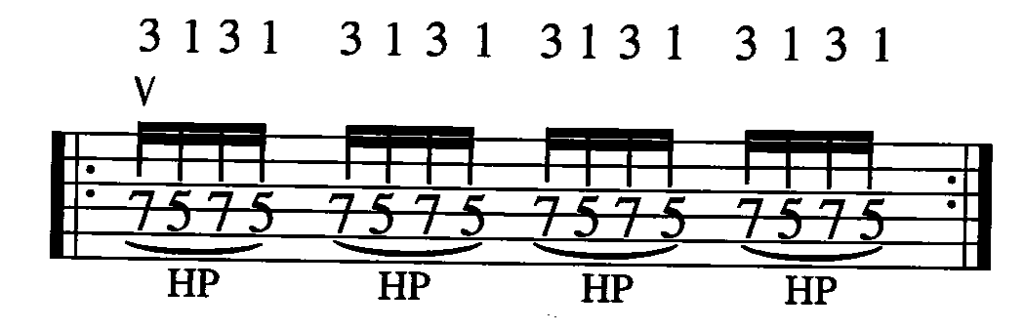
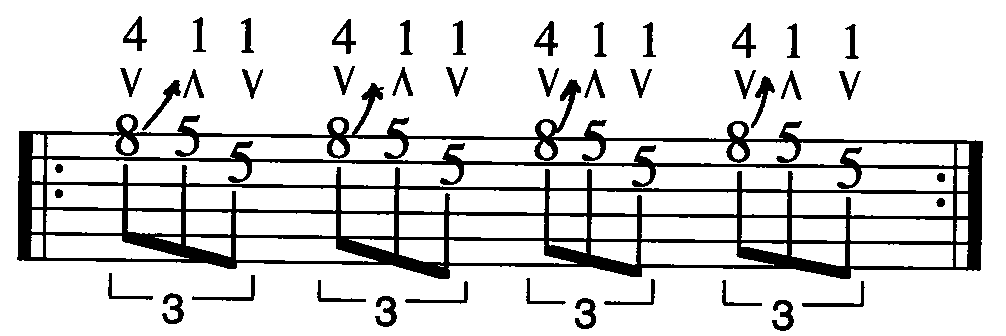
3. Play through the scle patterns in groups of 3, or triplets. Begin on the 1st scale tone and ascend 3 notes. Begin on the 2nd scale tone and ascend 3 notes, etc..

Descend through the scale in groups of 3, or triplets. Begin on the highest note of the scale and descend 3 notes. Next, begin on the 2nd highest note of the scale pattern and descend 3 notes from there, etc..

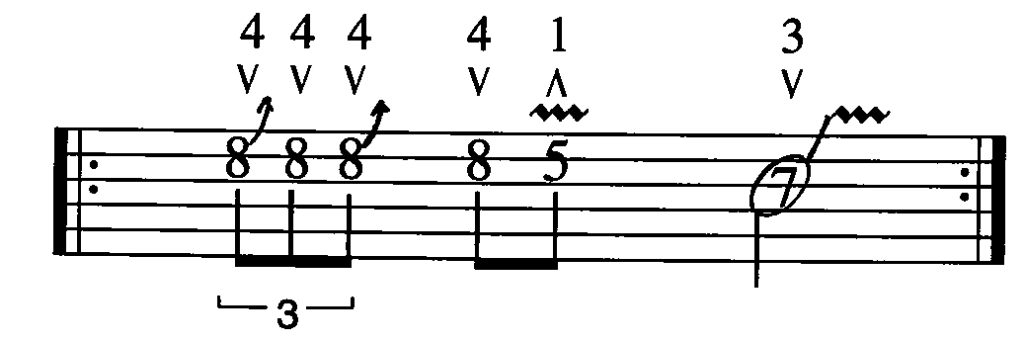
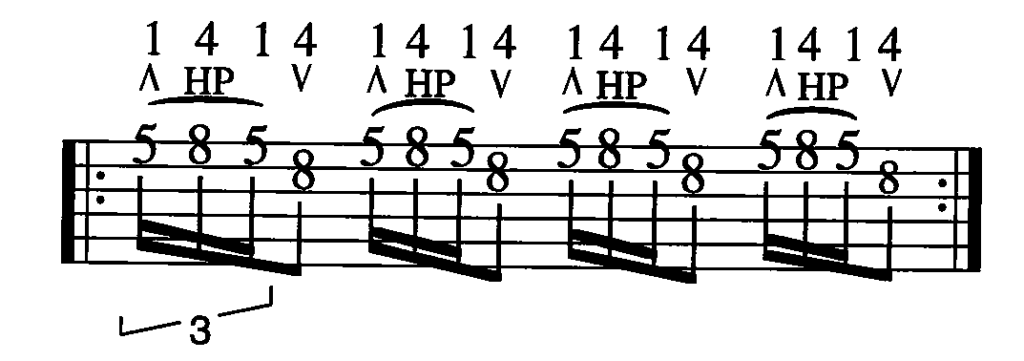
Next, ascend through the minor pentatonic scale pattern in groups of 4, or 16ths. Begin on the first scale tone and ascend 4 notes, Then, begin on the 2nd scale tone and ascend 4 notes up the scale from there, etc..

Descend through the minor pentatonic scale pattern in groups of 4, or 16ths. Begin on the highest note of the scale pattern and descend 4 notes. Follow that by starting on the 2nd highest note of the scale pattern and descending 4 scale notes from there, etc..

4. Technique. Technique adds finesse to any style of playing. It can be the difference between hearing a note sing and just hearing a plain, dull note.
Apply the following techniques to the A minor Pentatonic Scale.
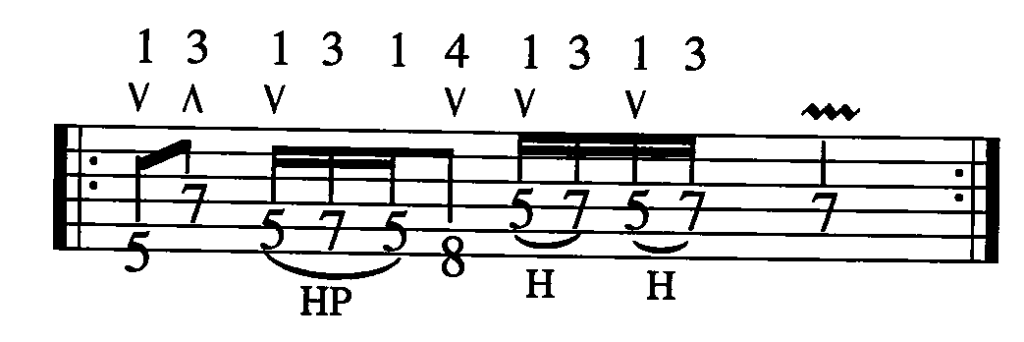
VIBRATO. The wavy line above a note indicates vibrato. A movement of the fretted note. Move the finger, which is sounding the note, back and forth or up and down slightly bending the string with each movement. This causes the note to be in pitch, out of pitch, in pitch, out of pitch, and so on. Keep in mind that you can control the speed of you vibrato technique as well. JS

BEND. An arched arrow indicates a bend. On the 6th, 5th, and 4th strings bend the string in a downward direction. On the 1st, 2nd, and 3rd string bend each note in an upward direction. When bending a note with either the 3rd or 4th finger…use more than just one finger to help you bend the note. In other words, support the finger which is fretting the note by adding another finger on the same string directly behind the finger fretting the note. This gives you strength. You will be using at least 2 fingers to bend the one note.

SLIDE. Pick the first note and keep the pressure on the string as you slide your finger up to the next note. The note that you have slid into is not picked. The letters “SL” indicate the slide technique is to be used.

SLUR. Pick the note and keep pressure on the string as you slide to the next note and back again to the original note that you picked. (There are variations on this, but that is the gist) Only pick the first note. the slur technique is indicated by the letters “SLR”.

HAMMER ON. Pick the first note, which would be the note that has the lower pitch, and then sound the next note by just fretting the note with out picking it. Use some force when you hammer the finger onto the 2nd note. In other words, don’t gently place your finger on the fret but rather “hammer on” the note. The Hammer On is indicated by a rainbow over the top of the notes being affected and the letter “H”.

PULL OFF. Place a finger on each of the notes involved in the pull off. Pick the first note, which would be the note with the higher pitch, then sound the lower note by pulling off the finger which is on the higher note. Even though it is called a pull off, the higher fretted note actually picks the string which in turn causes the lower note to be sounded. The pull off technique is indicated by a rainbow over the notes affected and the letter “P”.

HAMMER PULL. Pick the first note. Play the next note in the sequence by either using a hammer on or a pull off, and so on. In other words, hammer on if the next note in the sequence is higher in pitch, or pull off of the next note in the sequence is lower in pitch. The Hammer Pull technique is indicated by a rainbow over the affected notes and the letters “HP”.
OCTAVES. With the same hand that is fretting the notes, mute the strings which are not being sounded.
DOUBLE STOP. Two notes are played simultaneously.

5. RIFFS/LICKS. The intervals which make up the minor pentatonic scale are: 1 b3 4 5 b7. An interval being a measure of distance.
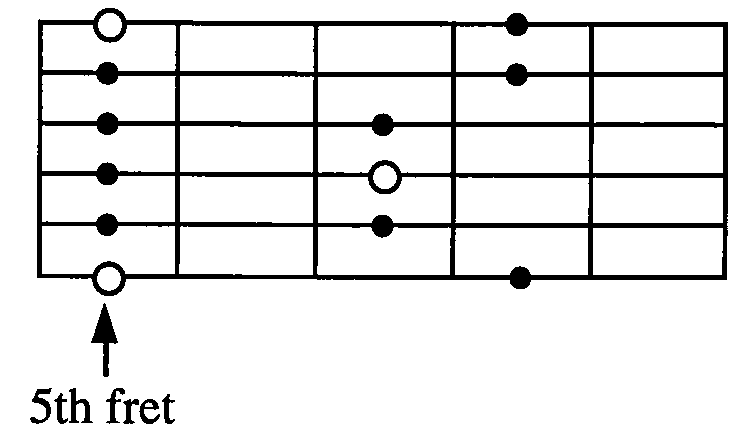
In the Minor Pentatonic Scale Diagram pictured below, the numbers indicate the distance each interval is away from the 1 (the 1 being the root, or key center).
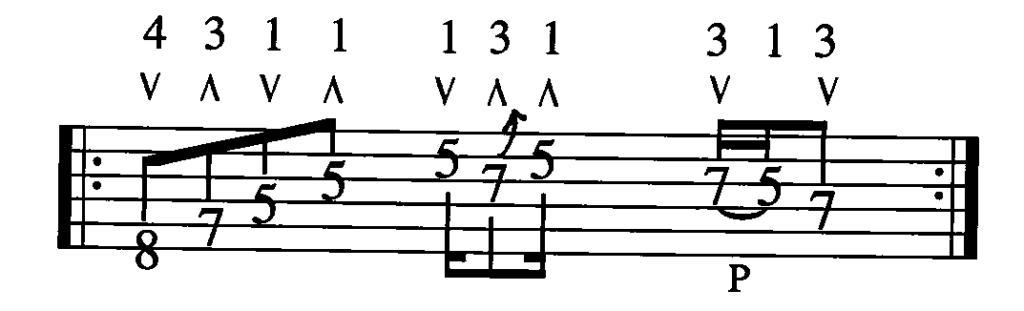
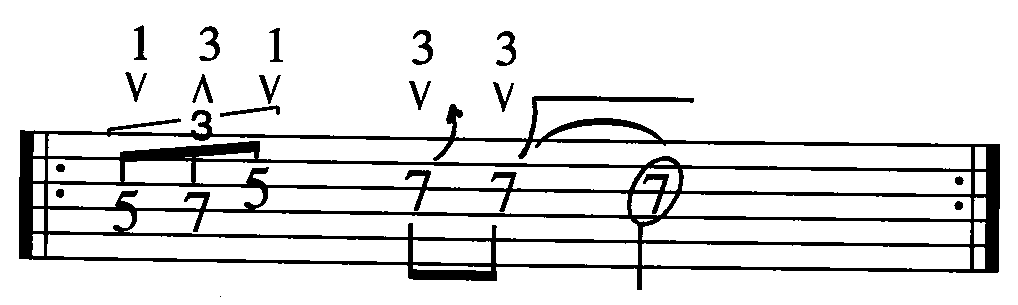
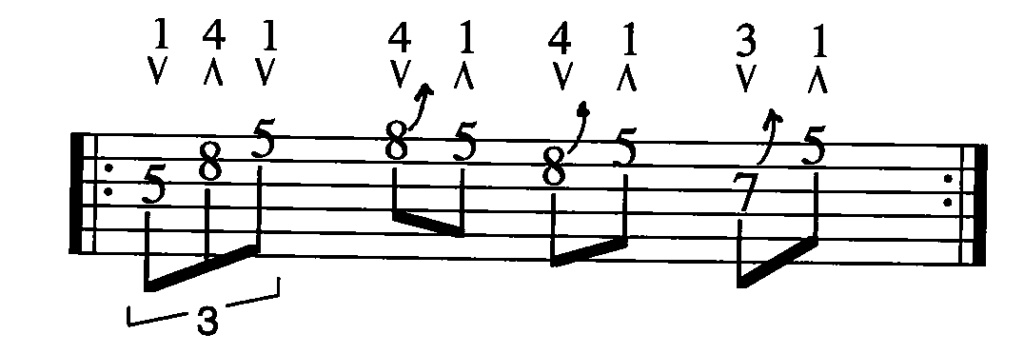
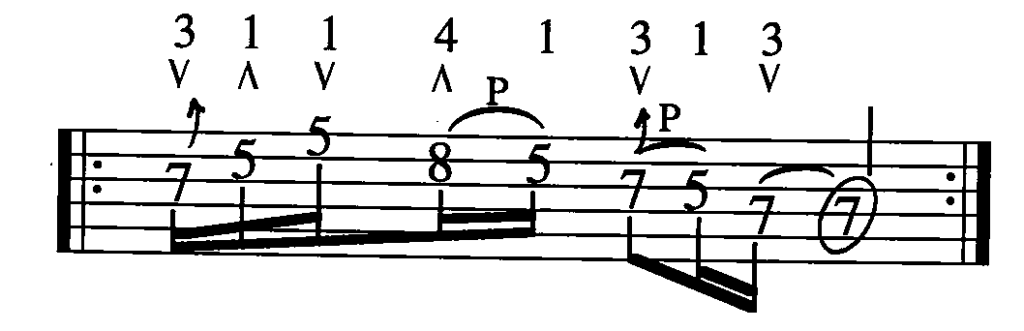
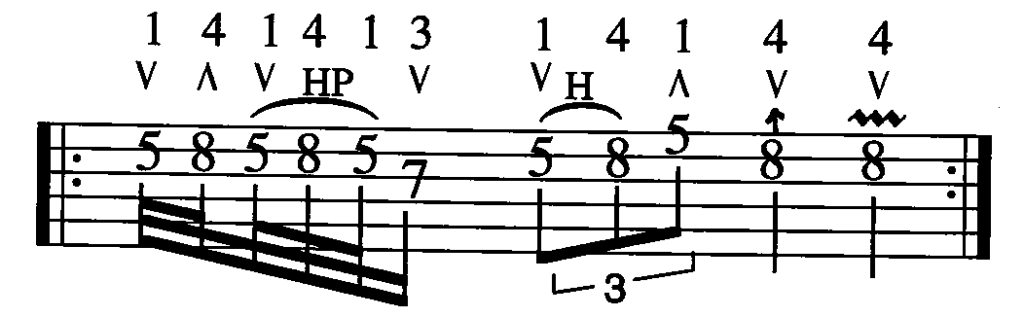
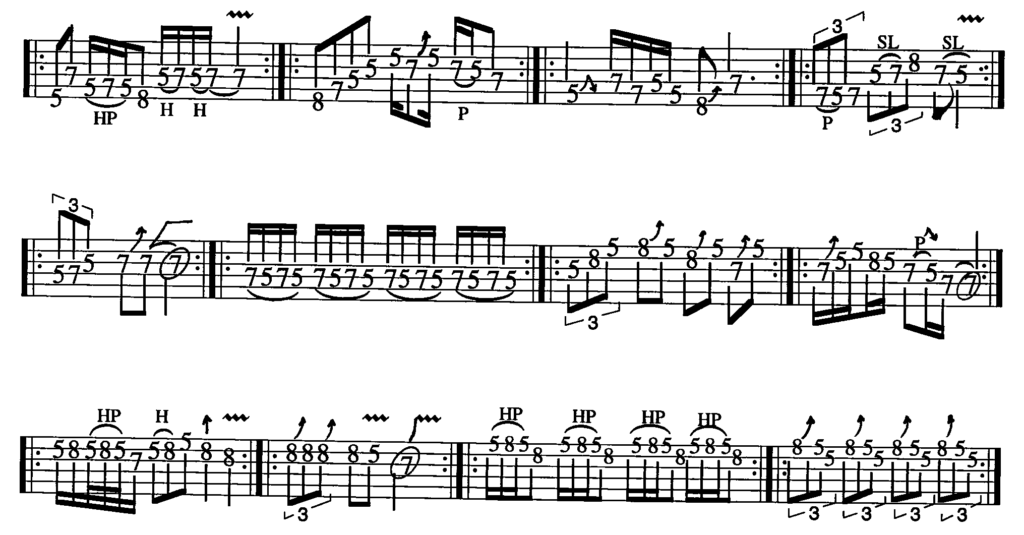
In the following exercise, a riff or lick has been structured on each scale interval of the minor pentatonic scale. In this case we are using the A Minor Pentatonic Scale. There is an advantage to memorizing these, or a riff of your own, for each scale interval. This is a method to help you develop your style. Having a memorized riff gives you the confidence, and certainty, that you will always have an idea under your fingers regardless of where you are. You can then ad lib within that idea, experiment, and go off on tangents.
RIFF/LICK BASED OFF OF THE 1
RIFF/LICK BASED ON THE b3 INTERVAL
RIFF/LICK BASED ON THE 4th INTERVAL
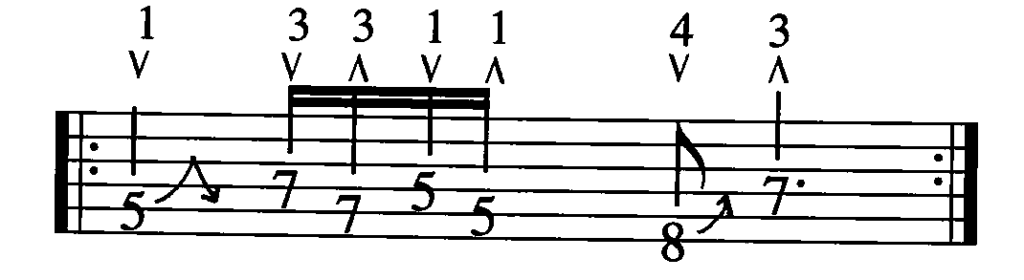
RIFF/LICK BASED ON THE 5th INTERVAL
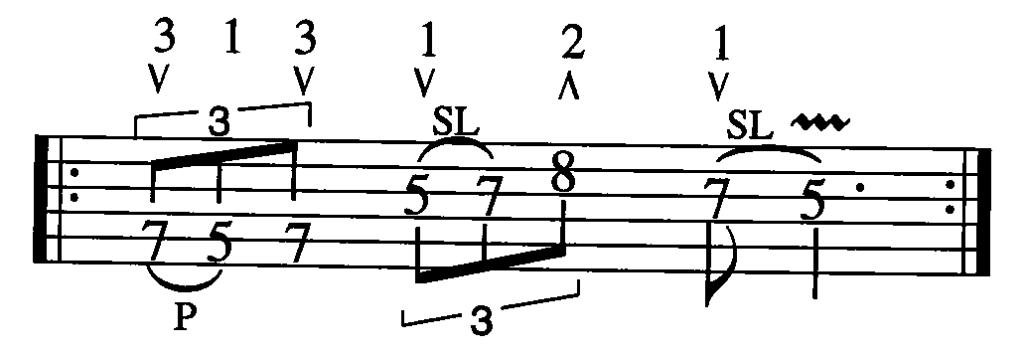
RIFF/LICK BASED ON THE b7 INTERVAL
RIFF/LICK BASED ON THE OCTAVE
RIFF/LICK BASED ON THE b3, OR #9, INTERVAL
RIFF/LICK BASED ON THE 4TH or 11TH INTERVAL
RIFF/LICK BASED ON THE 5th (2nd OCTAVE)
RIFF/LICK BASED ON THE b7 (2nd OCTAVE)
RIFF/LICK BASED ON THE ! (3rd OCTAVE)
RIFF/LICK BASED ON THE b3 (3rd OCTAVE
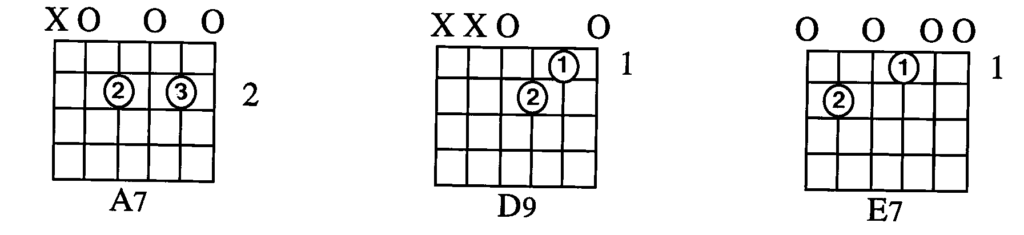
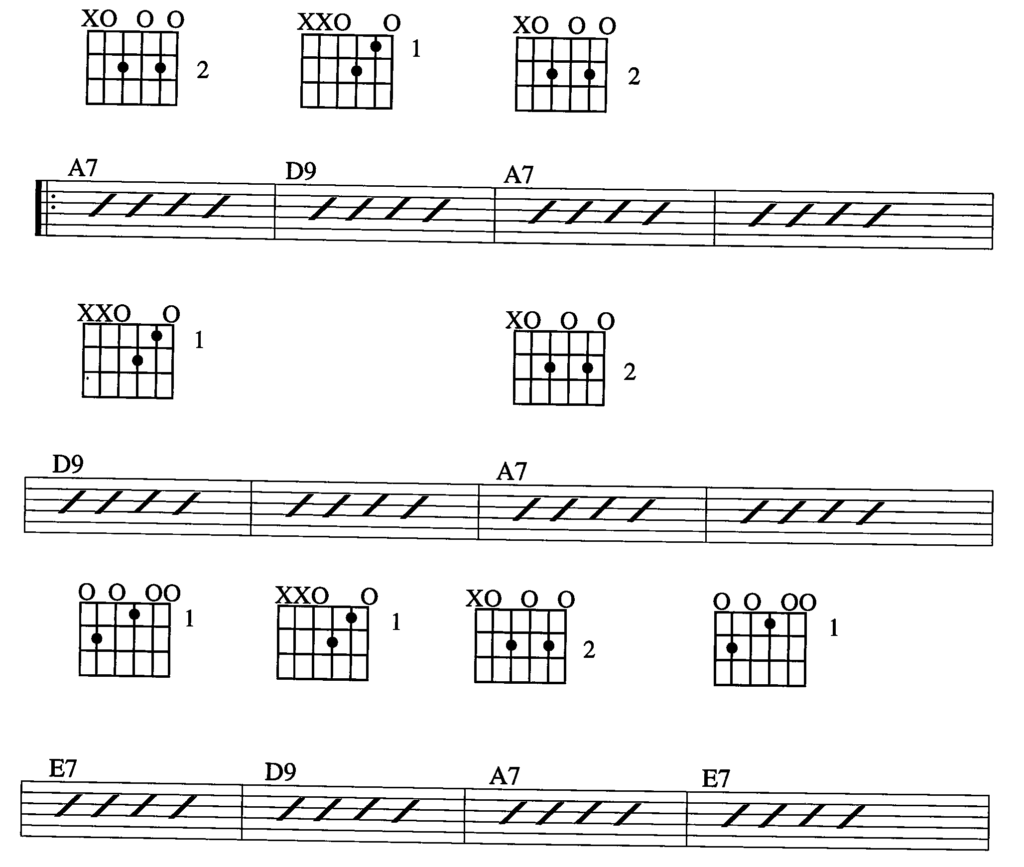
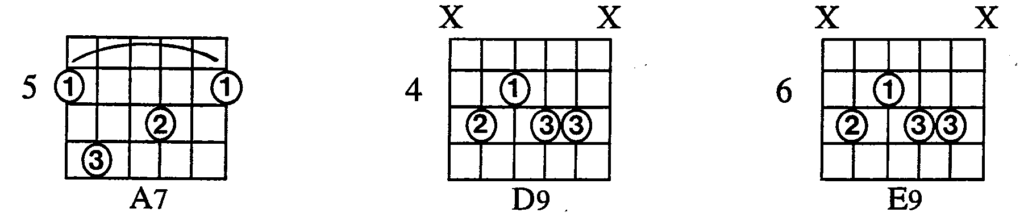
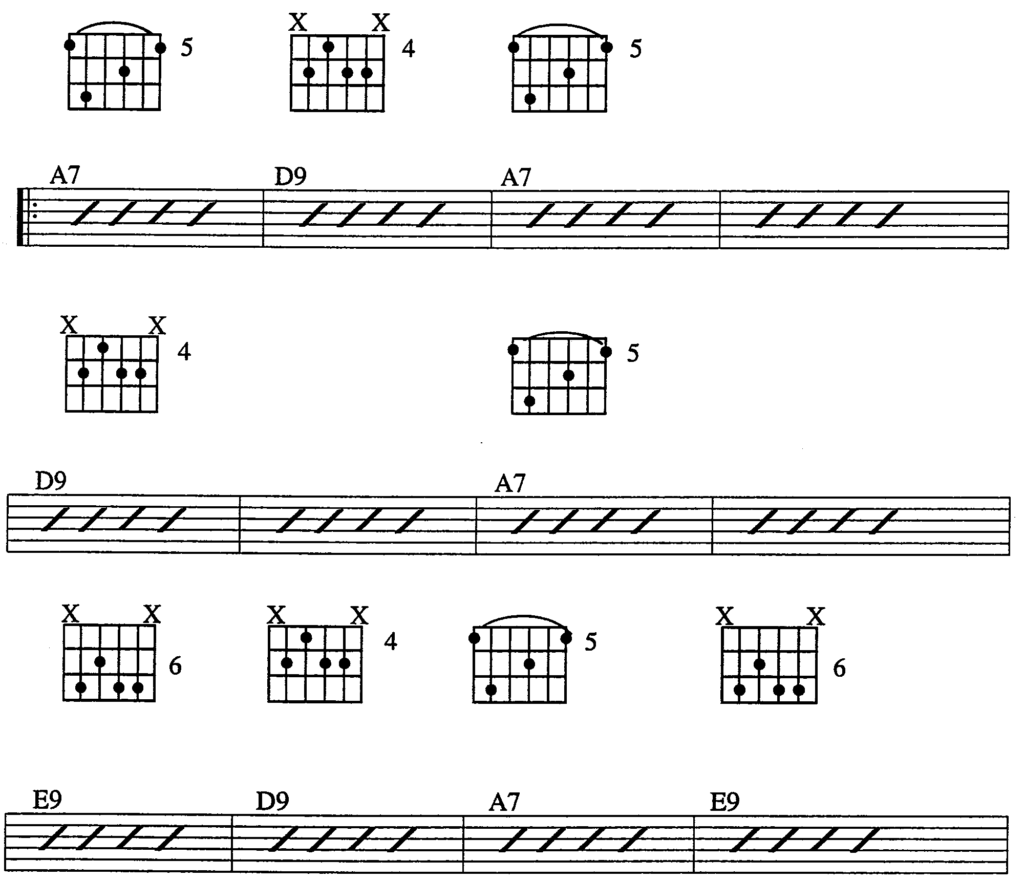
6. The following are 2 examples of a 12 bar blues progression in the key of A. The first example uses chords in the open position. The second example uses a dominant 7 barre chord and the often used 9 chord.
The chord progression should be played to the point where it becomes instinct…..memorized and ingrained into your being.
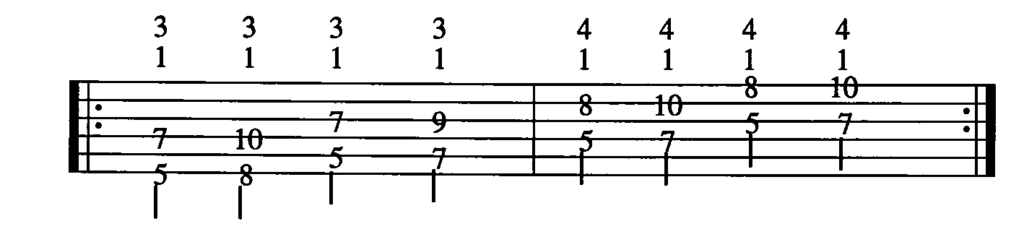
LEFT HAND FINGERING
12 BAR BLUES PROGRESSION
LEFT HAND FINGERING
12 BAR BLUES PROGRESSION
Play through this lesson until you feel comfortable with all of the information it contains. I hope this helps you achieve your goals. Jim Sutton
***Hard Copy of Blues Lead Guitar Study 1 is available for sale on Https://www.jsiguitar.net
